
New Arrival 18% Off

Buy EZVIZ H7C 360° WiFi
CCTV Camera in Nepal – Best Price

Get EZVIZ H7C 360° WiFi CCTV camera in Nepal. Full HD, night vision, motion alerts & easy app control. Order now with fast delivery & support. shops across Nepal.

रू 7500 रू 8500 Save रू 1,000
📡
Wi-Fi 2.4GHz

Works on any home network

🌙
Night Vision

IR up to 10m darkness

🔄
360° Pan-Tilt

Full coverage via app

📱
Live View

Watch from anywhere

🔔
Motion Alerts

Instant notifications

💾
SD + Cloud

Up to 128GB card

Resolution1080p Full HD
AudioTwo-way mic + speaker
ConnectivityWi-Fi 2.4GHz
SocketE27 (standard bulb)
Warranty1 Year Nepal Service
Quantity
1
🚚Free delivery in Kathmandu
🔧installation support
↩️7-day return policy
Shopping Bag
0 items
🛍️

Your bag is empty.
Add some items above!

✅ Added to bag!
📷
CCTV Tech Nepal
Doc No: CTN-PROC-001  |  Ver: 1.0  |  Date:

EZVIZ H7C Wireless Setup Procedure

Step-by-step installation guide for Pan & Tilt Smart Home Camera

0 of 0 steps completed 0%
🎯
Model
EZVIZ H7C (2K)
📶
Connectivity
Wi-Fi 2.4 GHz
⏱️
Est. Time
10 – 15 minutes
🔧
Tools Required
Smartphone + App
⚠️
Important: The EZVIZ H7C only supports 2.4 GHz Wi-Fi. Ensure your router is on 2.4 GHz before starting. 5 GHz networks will not work.
1
Prerequisites & Requirements
Before You Begin
Verify box contents
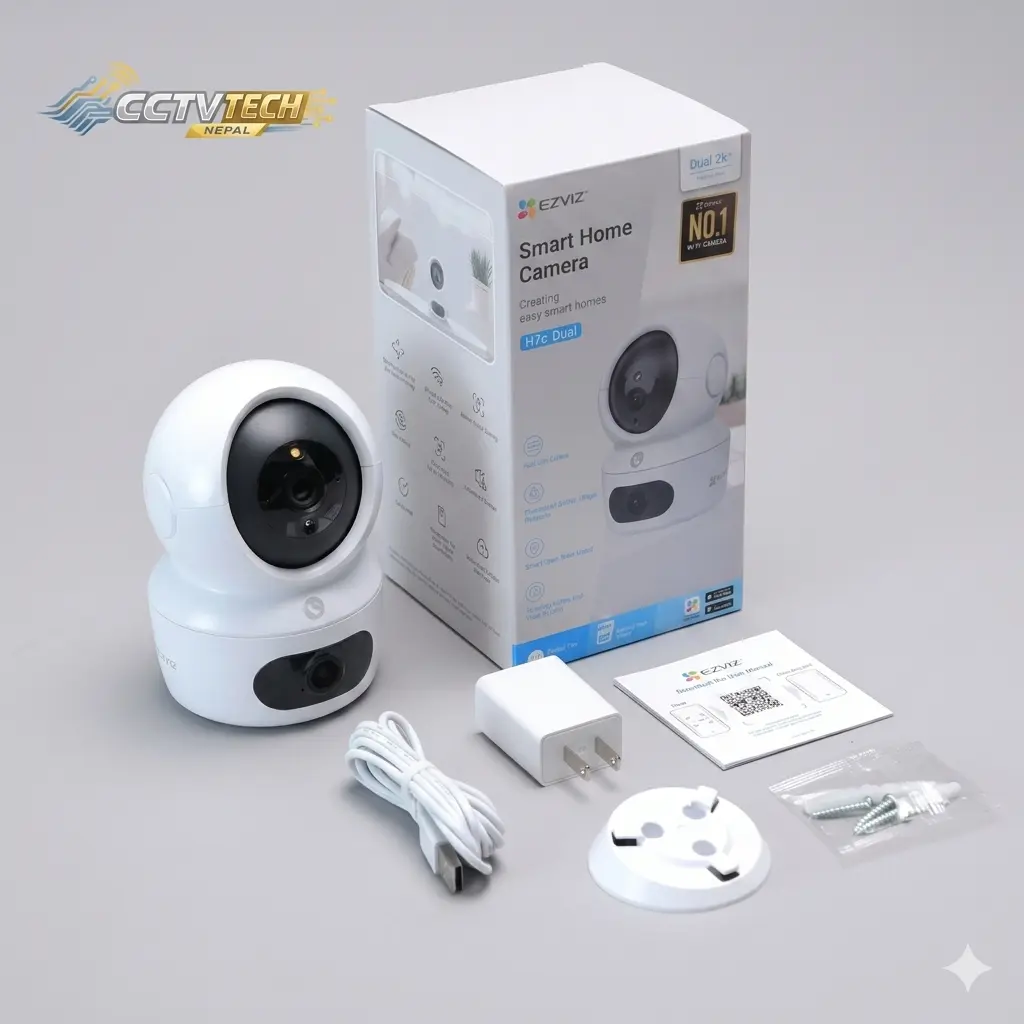
Confirm you have: EZVIZ H7C camera, power adapter (5V/1A), micro-USB cable, mounting bracket & screws, and Quick Start Guide.
Check smartphone compatibility
Android 5.0+ or iOS 11.0+ required. At least 100MB free storage needed for the app.
Confirm Wi-Fi is 2.4 GHz
Check your router SSID. If combined band, separate the 2.4 GHz network with a distinct name first.
💡 Log in to your router admin panel and enable separate SSIDs if needed.
Place camera near router initially
Keep within 3 metres of router during setup. Relocate after successful connection.
2
Install EZVIZ App
~2 min
Download the EZVIZ app
Search "EZVIZ" on Google Play Store (Android) or Apple App Store (iOS) and install the official app.
Create an EZVIZ account
Open app → tap Sign Up → enter email → verify OTP → set password.
💡 Already have an account? Skip to the next step.
Log in & allow permissions
Grant the app access to: Camera, Microphone, Notifications, and Local Network.
3
Power On & Initialize Camera
~2 min
Connect power adapter
Plug micro-USB into camera and adapter into wall socket. Camera will rotate to calibrate on startup.
Wait for LED — slow red blink = ready
After ~10 sec you'll hear a startup chime. LED blinking red slowly means it's ready to pair.
💡 If LED is solid red or not blinking, do a factory reset below.
Reset camera (if previously configured)
Hold reset button on the base for 5 seconds until you hear a beep. Wait ~15 sec for restart.
4
Add Device in EZVIZ App
~5 min
Tap "+" → Add Device
In the EZVIZ app home screen, tap the + icon (top right) then select Add Device.
Scan QR code on the camera
Point your phone at the QR code on the bottom or back of the H7C. App will recognise the device automatically.
💡 Alternatively tap "Enter Serial Number" and type the S/N from the device label.
Enter Wi-Fi credentials
Select your 2.4 GHz network and enter the password carefully. Wrong password is the most common setup failure.
Show app QR code to camera lens
App displays a QR on your phone. Hold it 15–20 cm in front of the lens until you hear a confirmation beep.
Wait for solid blue LED = connected
LED goes: blinking red → blinking blue → solid blue. Takes 30–60 seconds.
✅ Solid blue LED = Successfully connected to Wi-Fi!
5
Initial Camera Configuration
~3 min
Name your device
Give the camera a clear name (e.g. "Living Room", "Baby Room"). Tap Save.
Set device password
Create a strong device password (min. 8 characters). This is separate from your EZVIZ account password.
Insert MicroSD card (optional)
Insert Class 10 MicroSD (up to 256 GB) in the base slot. Format via app: Device Settings → Storage → Format.
Test live view & two-way audio
Tap the device to open live view. Hold the mic icon to speak and confirm audio from the camera speaker.
6
Technical Specifications
Reference
ParameterSpecification
Resolution2K (2304 × 1296) @ 20fps
Lens4mm, F2.0, 81° horizontal FoV
Pan / Tilt Range340° horizontal / 55° vertical
Night VisionIR LEDs, up to 10 m (33 ft)
Wi-Fi StandardIEEE 802.11b/g/n (2.4 GHz only)
Power Input5V DC / 1A via Micro-USB
Local StorageMicroSD up to 256 GB (Class 10)
Cloud StorageEZVIZ CloudPlay (subscription)
AudioTwo-way with noise cancellation
Operating Temp-10°C to 50°C
Dimensions78 × 78 × 116 mm
Weight250g
7
Troubleshooting
Help
⚠️ LED stays solid red / won't enter pairing mode
Hold reset button 5–8 sec until you hear a beep. Wait 15 sec — LED should then blink red slowly.
⚠️ App cannot find camera after QR scan
Ensure phone is on 2.4 GHz Wi-Fi (not 5 GHz or mobile data). Turn off VPN if active. Retry QR scan.
⚠️ Configuration QR code not recognized by camera
Set phone brightness to 100%. Hold 15–20 cm from lens at a slight tilt. Reduce glare from background lighting.
⚠️ Video is choppy or delayed
Move camera closer to router. Lower stream quality from HD to SD in app settings. Reboot your router.
⚠️ Camera goes offline after working
Check if Wi-Fi password changed. Reconnect via Device Settings → Wi-Fi Configuration in EZVIZ app.
⚠️ No sound from two-way audio
Verify Microphone permission is granted for EZVIZ app in your phone's system settings.

Frequently Asked Questions

Here is a list of the most frequently asked questions (FAQs) from our clients regarding our EZVIZ H7C CCTV Camera.

What video resolution does the EZVIZ H7C support?

The EZVIZ H7C records and streams video at 2k Full HD resolution (2560×1440). This delivers clear, detailed footage suitable for identifying faces and objects. The camera also supports night vision via infrared LEDs, providing up to 10 meters of visibility in complete darkness — ensuring 24/7 monitoring capability.


Setting up the EZVIZ H7C is straightforward: 

(1) Download the free EZVIZ app on iOS or Android. 

(2) Plug in the camera and power it on. 

(3) Open the app, tap “+” and select “Add Device.” 

(4) Scan the QR code on the camera or enter the serial number. 

(5) Connect the camera to your 2.4GHz Wi-Fi network. Setup takes under 5 minutes and no technical knowledge is required.

Yes. The EZVIZ H7C features AI-powered motion detection that sends instant push notifications to your smartphone whenever movement is detected. It supports customizable motion detection zones, allowing you to define specific areas of the room to monitor. You can also adjust sensitivity levels to reduce false alarms from pets or passing shadows. Alerts are delivered via the EZVIZ app in real time.

The EZVIZ H7C supports two storage methods: local storage via a microSD card (up to 256GB, sold separately) and cloud storage through the EZVIZ CloudPlay subscription service. With local storage, footage is saved directly on the camera with no monthly fee. Cloud storage provides remote access to recordings from anywhere and protects footage even if the camera is stolen or damaged. Both options can be used simultaneously.

Yes. The EZVIZ H7C is compatible with Amazon Alexa and Google Assistant. You can use voice commands to view the live camera feed on Alexa-enabled displays (such as Echo Show) or Google Nest Hub screens. Simply link your EZVIZ account in the Alexa or Google Home app, and use commands like “Alexa, show me the living room camera” to access the feed hands-free.